All credits belong to the OpenCore official guide. I cannot complete without the super detailed guide. 🙂
Hardware is the first step for Hackintosh. You need compatible computer parts that macOS can support. I have successfully build my Hackintosh system on a desktop PC and a laptop.
Please refer to the OpenCore official guide to buy your computer parts. I will only share my experience in this article.
CPU
First of all, I recommend Intel CPU. According to the guide. It appears a bit hard and extra steps if you use AMD CPU.
Memory
Memory is more flexible. I have tried from high-end Samsung DIMMs to some super cheap DIMMs (32GB per DIMM). I didn’t see any issue.
Hard Disk
Hard disk is also flexible. You can use SATA to NVMe. However, I would recommend SATA SSD or NVMe SSD. It’s much faster. My macOS loading speed is about 4 – 6 seconds with NVMe SSD. And any brand is ok. My desktop PC use SAN Disk. And my laptop uses a cheap ($85 for 512 GB) no-brand SATA SSD.
GPU
A graphics card is essential. It impacts Apple TV+, NetFlix, and any other online streaming services that use Apple DRM technology. I assume you are using Intel CPU. And you only want to use the embedded graphics card. You will not be able to watch movies on Apple TV+. (I have tried all options. Please let me know if you figured it out.) If you use an external graphics card. AMD card is the best choice since Apple’s computers use only AMD graphics cards.
And “iGPU” means the embedded graphics card. “dGPU” means the external graphics card. If you have a proper dGPU, you build a Hackintosh computer by following the OpenCore official guide. And you find Apple TV+ still doesn’t work. In addition, you need to run the following command in the terminal:
The wifi card is a critical part of achieving most of Apple’s unique functions. Such as AirDrop, SideCar, AirPod, and Apple Watch unlock, etc. The suggestion is to buy a second-hand Apple wifi card or something natively supported by macOS. For example, my laptop uses the DW1820A wifi card. The part number is CN-08PKF4 which is perfectly running on my Dell Inspiron 15-7569! I would recommend the same card if you have a Dell laptop. Please make sure the part number is the same as mine. I tried some other model on the Dell laptop. No one works.
Other Consideration
In addition. You also need to prepare a USB keyboard and mouse if you build Hackintosh on a laptop. The laptop keyboard and touchpad may not work in the macOS installation if you do not configure OpenCore properly. So you may need to use the USB keyboard and mouse temporarily.
You may see vpxd.stats.maxQueryMetrics relevant error when retrieving performance data of ESXi hosts, virtual machines, or other entities on vCenter Server by PowerCLI. The full error message:
This operation is restricted by the administrator – ‘vpxd.stats.maxQueryMetrics’. Contact your system administrator
VMware published a KB about how to fix that. Please notice that the mentioned vCenter advanced parameter config.vpxd.stats.maxQueryMetrics is case-sensitive.
202203 Update:
The parameter is removed in vCenter Advanced Settings after upgrading to vCenter Server 7.x. You have to reconfigure it.
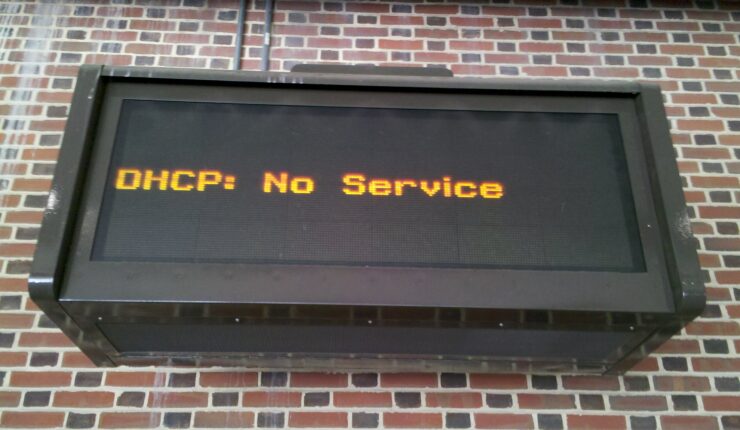
My home lab virtual machines are connected on private network 192.168.1.x. All internet traffic goes to a gateway server and is forwarded over the internet network adapter. The gateway server is a DHCP server also to assign IP addresses to my lab devices. The benefit to use my own DHCP server is I can control some advanced DHCP settings in the simple GUI interface. However, I didn’t find the DHCP settings on VMware Fusion 12 for the private network. And my VMs got 172.x.x.x DHCP IP addresses automatically.
The reason is I’m using macOS Big Sur. Apple requests developers to use the vmnet framework for network virtualization programming. The framework only offers limited functions for virtualized networking. This limitation is confirmed by VMware staff in the community.
Since macOS has its own DHCP server. One workaround is to disable the native DHCP server by following the command which is mentioned in the same post:
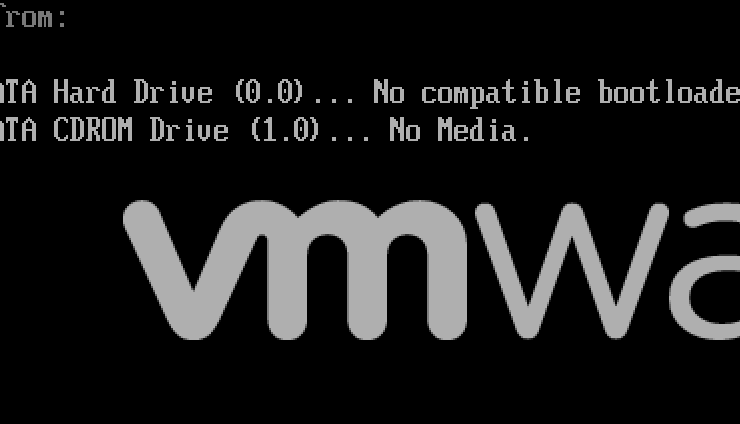
I installed a macOS virtual machine on VMware Fusion. As you may know, the installation time is super long. It took me about 1 hour to complete the installation. To save recovery time in case my computer OS needs to be re-installed. I exported the virtual machine to an OVA file to another partition.
However, the virtual machine failed to boot up when I imported the OVA file as a new virtual machine. I got the following error message:
Mac OS X… No Media
And the virtual machine entered the Boot Manager screen after few minutes. Mac OS X was in the boot list. However, it wouldn’t allow me to boot even I chosen it manually.
I tried to reset NVRAM for the virtual machine. It’s no luck. BTW, Apple has an official article talks about how to reset NVRAM or PRAM on your Mac. I’m not sure is it suitable for macOS virtual machines. I just simply delete the *.nvram file in the virtual machine’s package.
I also tried to reset BIOS and EFI booting order…etc. No one works.
Finally, I created a new empty virtual machine with macOS 11.0 as the operating system. And compared the configuration file between the empty and imported virtual machines. And I noticed that the guestos parameter was different:
My imported virtual machine is guestos = "other".
The empty virtual machine is guestOS = "darwin20-64".
The fix is just simply to change the guest OS from other to darwin20-64.
I’m not sure why the parameter was changed after exporting and importing. It may be a VMware Fusion bug.
VMware Fusion is quite different from VMware Workstation. To open the VMX file for a virtual machine. You need to right-click the virtual machine in the virtual machine library and hold the Option (Alt) key, then select Open Config File in Editor.
I used to see two common errors on the new created Microsoft Failover Cluster. “DNS bad key” and CNO update error.
Cluster network name resource ‘Cluster Name’ failed registration of one or more associated DNS name(s):
DNS bad key
or
Cluster network name resource failed registration of one or more associated DNS names(s) because the access to update the secure DNS Zone was denied.
The error “DNS bad key” is more often rather than the other error. I did a lot of study on the internet. The issue was fixed after applying the following steps:
Right click the Windows button – Click Run.
Run following command to enter Network Connections. ncpa.cpl
Go to Properties of the network adapter that you are using for Microsoft Failover Cluster.
Go to Internet Protocol Version 4 (TCP/IPv4) – Advanced – DNS tab.
Deselect the Register this connection’s addresses in DNS.
The cluster error events appears in event log in regular frequency. If you want to test it without waiting. You can initiate a core cluster resource failover to test it.
How to move core cluster resource?
Microsoft Cluster Failover – Right click the cluster – More actions – Move Core Cluster Resources.
The Azure image was introduced in 2014 by Microsoft. It’s a more comprehensive image for Microsoft Azure Virtual Machines. Azure is a highly available cloud. Solution design needs to always take failover and tolerance into account. Therefore, copy Azure images to other subscriptions or regions is something we need to consider.
There are three methods to copy Azure images to other subscriptions or regions:
Option 1
Firstly, the easiest way to achieve that is to use the Image Gallery. It’s introduced in the middle of 2019. As Microsoft states: “Shared Image Gallery provides a simple way to share your applications with others in your organization, within or across Azure Active Directory (AD) tenants and regions. This enables you to expedite regional expansion or DevOps processes and simplify your cross-region HA/DR setup.“
The high-level procedure is to create a new Image Gallery, create image definition and version, and then add replica regions in the version. If you want to use the image gallery in other subscriptions. You need to grant proper access permission of other subscriptions accounts to the image gallery through RBCA.
Option 2
The first solution above is GUI based. I’m a super fan of scripting. In other words, I prefer to use Azure CLI to achieve it. The official Azure CLI doesn’t contain the image copy command. However, there is an Azure CLI Image Copy Extension you can use. Basically, it copies the source image’s virtual disk file to destination subscriptions or regions.
You need to install Azure CLI, and then install the extension use the command below.
az extension add --name image-copy-extension
Option 3
The last option is actually the manual process of the secondary solution. Basically, you need to create a new VM from the source image, and then move the VM to the other subscriptions or regions. Finally, capture an image by the moved VM. This is not my recommendation.
HashiCorp Packer is a standalone tool for image management across multi-cloud providers. The installation is simple. But you may experience packer command naming conflicts if the OS is Red Hat or CentOS.
For example, run following command and see nothing returned back on the screen.
If you see same behavior on the machine. Certainly you are experiencing the same issue here.
The reason is the packer naming conflicts with the Red Hat / CentOS native module cracklib. Some articles on the internet say delete the native packer command. However, I think that’s not an ideal option. Because the module is used to generate a random password and check the password complex level.
The alternative I’m using is rename my HashiCorp Packer command.
Firstly, you need to rename the HashiCorp Packer command:
mv packer packer.io
Secondary, specific the HashiCorp Packer path in the environment variables. I assume the HashiCorp Packer is installed under /packer/ directory.
cd /etc/
echo 'PATH="$PATH:~/packer/"' >> .bash_profile
source .bash_profile
The drawback is you have to use the renamed command packer.io instead of packer for HashiCorp Packer.
“Static Key Ciphers” are used on Windows Server 2016/2019 for backward compatibility with legacy applications. It existing on Windows operating system by default. Hackers can decrypt the traffic if the weak cipher suites are being used. Hence how to secure the traffic is important for Windows security.
In short, certain communication security protocols and cipher suites should be disabled on Windows Server 2016/2019.
What’s Cipher?
Cipher is the algorithm of translation between plaintext and ciphertext. There are two algorithm categories: The symmetric key algorithm and the asymmetric key algorithm. Symmetric key algorithms use one key for encryption and decryption. Asymmetric key algorithms use different keys for encryption and decryption.
The popular ciphers are DES, AES, RSA, SHA…etc. However, some of them are out-of-date. And some maybe not in compliance with certain information security standards.
What’s the Cipher Suite?
A cipher suite is a set of ciphers and security protocols. A server encrypts data with a cipher suite. And a client decrypts data with the same cipher suite.
Naming Convention of Ciphers
Different Windows Server versions support different cipher suites. Following is the default cipher suite list for TLS protocol on Windows Server 2016/2019. As you can see, Windows Server 2019 supports few advanced cipher suites in addition.
Cipher Suites have an order on Windows. It always picks up the best cipher suite. “The best” means it must match two criteria:
At least one cipher suite in the order must be supported by the application.
The chosen cipher suite is the top one in the supported list.
If Windows cannot find a suitable cipher suite, then the communication is failed. As a result, you will see error messages in Windows Event Log (Similar to the event log samples below).
Windows Server 2016
Windows Server 2019
N/A
TLS_AES_128_GCM_SHA256
N/A
TLS_AES_256_GCM_SHA384
TLS_DHE_DSS_WITH_3DES_EDE_CBC_SHA
N/A
TLS_DHE_DSS_WITH_AES_128_CBC_SHA
N/A
TLS_DHE_DSS_WITH_AES_128_CBC_SHA256
N/A
TLS_DHE_DSS_WITH_AES_256_CBC_SHA
N/A
TLS_DHE_DSS_WITH_AES_256_CBC_SHA256
N/A
TLS_DHE_RSA_WITH_AES_128_CBC_SHA
N/A
TLS_DHE_RSA_WITH_AES_128_GCM_SHA256*
TLS_DHE_RSA_WITH_AES_128_GCM_SHA256*
TLS_DHE_RSA_WITH_AES_256_CBC_SHA
N/A
TLS_DHE_RSA_WITH_AES_256_GCM_SHA384*
TLS_DHE_RSA_WITH_AES_256_GCM_SHA384*
TLS_ECDHE_ECDSA_WITH_AES_128_CBC_SHA
TLS_ECDHE_ECDSA_WITH_AES_128_CBC_SHA
TLS_ECDHE_ECDSA_WITH_AES_128_CBC_SHA256
TLS_ECDHE_ECDSA_WITH_AES_128_CBC_SHA256
TLS_ECDHE_ECDSA_WITH_AES_128_GCM_SHA256*
TLS_ECDHE_ECDSA_WITH_AES_128_GCM_SHA256*
TLS_ECDHE_ECDSA_WITH_AES_256_CBC_SHA
TLS_ECDHE_ECDSA_WITH_AES_256_CBC_SHA
TLS_ECDHE_ECDSA_WITH_AES_256_CBC_SHA384
TLS_ECDHE_ECDSA_WITH_AES_256_CBC_SHA384
TLS_ECDHE_ECDSA_WITH_AES_256_GCM_SHA384*
TLS_ECDHE_ECDSA_WITH_AES_256_GCM_SHA384*
TLS_ECDHE_RSA_WITH_AES_128_CBC_SHA
TLS_ECDHE_RSA_WITH_AES_128_CBC_SHA
TLS_ECDHE_RSA_WITH_AES_128_CBC_SHA256
TLS_ECDHE_RSA_WITH_AES_128_CBC_SHA256
TLS_ECDHE_RSA_WITH_AES_128_GCM_SHA256*
TLS_ECDHE_RSA_WITH_AES_128_GCM_SHA256*
TLS_ECDHE_RSA_WITH_AES_256_CBC_SHA
TLS_ECDHE_RSA_WITH_AES_256_CBC_SHA
TLS_ECDHE_RSA_WITH_AES_256_CBC_SHA384
TLS_ECDHE_RSA_WITH_AES_256_CBC_SHA384
TLS_ECDHE_RSA_WITH_AES_256_GCM_SHA384*
TLS_ECDHE_RSA_WITH_AES_256_GCM_SHA384*
TLS_PSK_WITH_AES_128_CBC_SHA256
TLS_PSK_WITH_AES_128_CBC_SHA256
TLS_PSK_WITH_AES_128_GCM_SHA256
TLS_PSK_WITH_AES_128_GCM_SHA256
TLS_PSK_WITH_AES_256_CBC_SHA384
TLS_PSK_WITH_AES_256_CBC_SHA384
TLS_PSK_WITH_AES_256_GCM_SHA384
TLS_PSK_WITH_AES_256_GCM_SHA384
TLS_PSK_WITH_NULL_SHA256
TLS_PSK_WITH_NULL_SHA256
TLS_PSK_WITH_NULL_SHA384
TLS_PSK_WITH_NULL_SHA384
TLS_RSA_WITH_3DES_EDE_CBC_SHA
TLS_RSA_WITH_3DES_EDE_CBC_SHA
TLS_RSA_WITH_AES_128_CBC_SHA
TLS_RSA_WITH_AES_128_CBC_SHA
TLS_RSA_WITH_AES_128_CBC_SHA256
TLS_RSA_WITH_AES_128_CBC_SHA256
TLS_RSA_WITH_AES_128_GCM_SHA256
TLS_RSA_WITH_AES_128_GCM_SHA256
TLS_RSA_WITH_AES_256_CBC_SHA
TLS_RSA_WITH_AES_256_CBC_SHA
TLS_RSA_WITH_AES_256_CBC_SHA256
TLS_RSA_WITH_AES_256_CBC_SHA256
TLS_RSA_WITH_AES_256_GCM_SHA384
TLS_RSA_WITH_AES_256_GCM_SHA384
TLS_RSA_WITH_NULL_SHA
TLS_RSA_WITH_NULL_SHA
TLS_RSA_WITH_NULL_SHA256
TLS_RSA_WITH_NULL_SHA256
TLS_RSA_WITH_RC4_128_MD5
N/A
TLS_RSA_WITH_RC4_128_SHA
N/A
Which Should Be Disabled?
Firstly we need to look into the communication security protocols. SSL 1.0, SSL 2.0, SSL 3.0, TLS 1.0, TLS 1.1 and TLS 1.2 are popular protocols. They are enabled on Windows Server 2016/2019 by default. However, most of them are out-of-date due to certain vulnerabilities. For example, SSL 3.0 is killed by the POODLE attack. So the suggested protocol is TLS 1.2.
The protocols are controlled by registry keys. The registry location is HKLM SYSTEM\CurrentControlSet\Control\SecurityProviders\SCHANNEL\Protocols.
There are two keys for each protocol: Client and Server. The Microsoft KB only introduced how to disable PCT 1.0 for Server. You need to do the same for the Client. The KB was written for the earlier Windows version. But it also applicable for Windows Server 2016/2019
Secondly, dealing with cipher suites. There are a lot of articles on the internet to talk about cipher suites. But no straight answer on what should be disabled and how. I think the easiest way is to compare your current cipher configuration with the blacklist of RFC 7540.
I compared Windows Server cipher suites with it. All cipher suites in the table above are on the blacklist except the green text. In other words, the green text cipher suites are safe for TLS 1.2.
If you follow the blacklist. As a result, there will be only 6 cipher suites for Windows Server 2016 and 8 for Windows Server 2019. Most importantly. It may cause a lot of problems since the cipher suites may not be supported by the majority of 3rd party applications.
So, to balance security and compatibility. I think it may be reasonable to disable the out-of-date cipher suites only. After research. I think the cipher suites with red text in the table can be disabled on Windows Server 2016/2019.
You can get the current cipher suite configuration list with PowerShell:
(Get-TlsCipherSuite).Name
What’re the Impacts to Disable Cipher?
Because the cipher suite must be supported by application and Windows both. Therefore, there are two impacts to disable cipher suites on Windows Server 2016/2019. Firstly, it’s the internal impact. It means the native application may throw out errors if it doesn’t support TLS 1.2. For example, you may see the following error in Windows Event Logs after disabled SSL 1.0, SSL 2.0, SSL 3.0, TLS 1.0, and TLS 1.1 on a new provisioned Windows Server 2016/2019. The reason is TLS support for the .Net framework is not enabled.
Log Name: System Source: Schannel Date: 10/11/2020 1:1:1 PM Event ID: 36871 Task Category: None Level: Error Keywords: User: SYSTEM Computer: test.zhengwu.org Description: A fatal error occurred while creating a TLS client credential. The internal error state is 10013.
Secondly, It may impact communication with external services. For example, the 3rd party software only supports the disabled cipher suites. You may see following log in Windows Event Log:
Log Name: System Source: Schannel Date: 10/11/2020 11:11:01 PM Event ID: 36874 Task Category: None Level: Error Keywords: User: SYSTEM Computer: test.zhengwu.org Description: An TLS 1.2 connection request was received from a remote client application, but none of the cipher suites supported by the client application are supported by the server. The TLS connection request has failed.
How to Disable Cipher Suites?
There are several ways to control cipher suites. GPO is the recommended way. Or you can edit registry keys. But it’s inflexible. For example, It takes time to change the registry to disable a single cipher suite.
Microsoft introduced the PowerShell TLS module since Windows Server 2016. It supports to control a single cipher suite. I think it’s a better way compared with other ways. Because you can re-enable a cipher suite easily if the application doesn’t work.
You may need to access the internet with a VPN for privacy or performance. The most popular VPN solution is Shadowsocks. If you are an IT Pro, you may face a similar issue that I’m facing: How does VM share host VPN connection?
My home lab is running on top of VMware Workstation on a Windows 10 computer. The virtual machines use the NAT network to communicate outside. It goes over the internet through my ISP directly. The performance of AWS or Azure is slow.
I tried Shadowsocks on the Windows 10 computer. The performance is good. But Shadowsocks is not like other VPN solutions. Its only functions for the host computer (The Windows 10 computer). I had to run Shadowsocks client on each virtual machine to get the better speed.
I read an article that is talking about how to share host VPN with VirtualBox. It gave me some ideas. The solution is actully similar:
Make sure the “Allow Clients from LAN” option is checked in the Shadowsocks client.
Find out the IP address of the NAT network on VMware Workstation on the Windows 10 computer. (The NIC name is “VMware Network Adapter VMnet8” by default)
Configure the proxy in a virtual machine. The IP address is the same to step 2’s. And the port is 1080 by default.
You don’t have to disable the firewall on the host or guest machine. This is a very straightforward configuration to allow VM share host VPN connection.
It’s useful to get email notification when there is an alarm raised in vCenter Server. To configure the function. You need a valid SMTP server. And configure the SMTP server on vCenter Server. If there is a problem that vCenter Server is not sending email alerts. We need to isolate is it a vCenter Server side issue, or an SMTP server problem. Therefore how to identify problem source is important.
VMware moved vCenter Server to a customized Linux based platform since 5.5. It’s easy for administration, but limited ability in troubleshooting. You may notice that the telnet command is not available when troubleshooting the SMTP issue.
The following is how to troubleshoot such an issue on the vCenter Server virtual appliance.
Firstly, you need to ping the IP address and FQDN of the SMTP server. Make sure the basic connectivity between the vCenter Server and SMTP server is working.
Second, try to reach out to SMTP service on the vCenter Server to make sure the SMTP protocol can be established. Since the telnet command is unavailable on the vCenter Server virtual appliance. We use curl command as a workaround:
curl -v telnet://SMTP SERVER:SMTP PORT
For example:
curl -v telnet://zhengwu.org:25
You should see the keyword “Connected to zhengwu.org….” if the connection is successful. That means the basic connectivity between the vCenter Server and the SMTP server is working.
Then you can try sending an email manually on the vCenter Server shell. The following are the commands. Please note there is a . at the end of the command. It indicates the end of the mail.